Top 4 Ways to Play Deezer Music On Tesla
Best known for its electric vehicles, Tesla has pushed the boundaries of innovation by offering sleek, high-performance cars that run entirely on electricity. In addition to advanced technology, it also has a high-quality audio and integrated music system. Through cooperation with multiple music platforms, users can enjoy their favorite music in the car at any time.
The music streaming platforms supported by Tesla currently include Spotify, TIDAL, and TuneIn, but it does not yet support Deezer music. As a popular music streaming platform, Deezer provides a rich music library and high-quality music and is deeply loved by users. As a user of both Tesla and Deezer, it is a pity that Deezer Music cannot be enjoyed directly on Tesla. But it doesn’t matter, in this article, we will introduce four simple and easy methods to help you play your favorite Deezer music on Tesla. You can follow the specific guidelines we give to make your wish come true!
Part 1. Play Deezer Music Via Bluetooth
Although Deezer is not integrated with Tesla, you can also use other methods to play Deezer music on Tesla. First of all, the first method is to connect directly using Bluetooth. But you need to make sure that Bluetooth is turned on and the connection is normal. Another thing to note is that the sound quality of songs played via Bluetooth connection will be reduced due to wireless transmission. After understanding the precautions, you can follow the steps below:
Step 1.Turn on Bluetooth on your phone and make sure your Bluetooth is searchable.
Step 2.Click the Bluetooth button on the Tesla control screen, turn on Bluetooth, and select Add New Device > Start Search button.
Step 3.Select your phone among all available Bluetooth devices and connect.
Step 4.After ensuring that the phone and Tesla are successfully connected, you can open Deezer music on the phone and play your favorite songs.
Once your phone and Tesla are successfully connected, Tesla will automatically connect to your phone the next time you turn on Bluetooth, without pairing again.
Part 2. Play Deezer Music Via TeslaMirror App
The second way to play Deezer music on your Tesla is through the TeslaMirror app. TeslaMirror/TslaMirror is an app that will help your mobile(iPhone/iPad/Android) app mirror to Tesla vehicle! On Android, it is TeslaMirror. On iOS, it is TslaMirror. The specific steps are as follows:
Step 1.Turn on your phone's network hotspot and let your Tesla connect to the hotspot.
Step 2.Open the TeslaMirror app on your phone. Slide to open Tesla Proxy. And then click Start to start broadcasting.
Step 3.Back on the Tesla’s control panel, select the built-in browser, and enter the address given on your phone. Allow appropriate permissions after opening the page.
Step 4.Then the screen on the phone will be mirrored and projected onto the Tesla. At this time you can open Deezer music and play your favorite songs.
Part 3. Play Deezer Music Via USB Drive
The above two methods can indeed quickly connect Deezer music to Tesla for playback. However, the wireless transmission method will inevitably lead to a reduction in sound quality, disappointing some users who pursue high sound quality. At the same time, this connection method also requires a stable network environment, but we cannot guarantee that we will be in a smooth network environment when driving. If the network is disconnected, it means that you can no longer enjoy Deezer. music. Therefore, we will also propose two methods to play Deezer music offline on Tesla.
The third way to play Deezer music on Tesla is to play downloaded Deezer music on the USB drive. Two things are needed to use in this method, one is a USB drive and the other is a Deezer music converter. As a third-party tool that specializes in Deezer music conversion, DeeKeep Deezer Music Converter is the best choice. It can convert Deezer music to multiple common formats, such as MP3, WAV, ALAC, FLAC, etc., and retain rich ID3 tags and lyrics files. With DeeKeep, you can keep your favorite Deezer music permanently on your computer. These saved files can also be used on any device or program you want to play them on, regardless of subscription.
Next, we will guide you on how to download and transfer Deezer music to a USB drive for playback on Tesla.
Step 1.Run DeeKeep on Your Computer
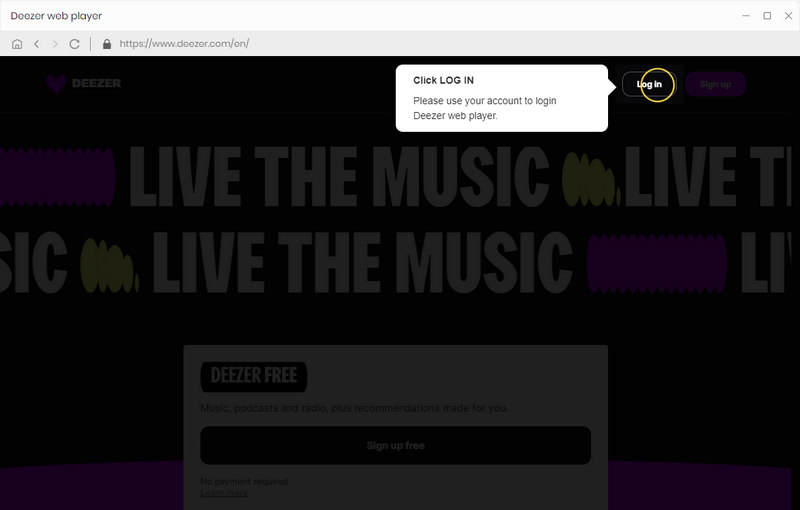
Click to open DeeKeep on your computer and the Deezer web player will pop up at the same time. Follow the instructions to log in to your Deezer account.
Step 2.Alter Output Settings As You Like
Go to the Settings tab in the lower left corner. Here you can choose the output format, output folder, output file name, and the organized way freely. If you want to save the original audio quality, select Auto as the output format. If you want to keep the lyrics file of the song, just select the Save lyrics (if provided) button and DeeKeep will automatically save the lyrics file in LRC format to the same output folder. The following is the specific classification of each output setting:
- Conversion Mode: Intelligent Mode, Web Download, YouTube Download
- Output Format: Auto, MP3, AAC, FLAC, WAV, AIFF, ALAC
- Bit Rate: 128kbps, 192kbps, 256kbps, 320kbps
- Sample Rate: 44.1kHz, 48kHz, 96kHz, 192 kHz
- Output Folder: Can be modified
- Output File Name: Track Number, Title, Artist, Album, Playlist Index, Year
- Output Organized: None, Playlist, Artist, Album, Artist/Album, Album/Artist, Playlist/Artist, Playlist/Album

Step 3.Pick Up Deezer Music You Want
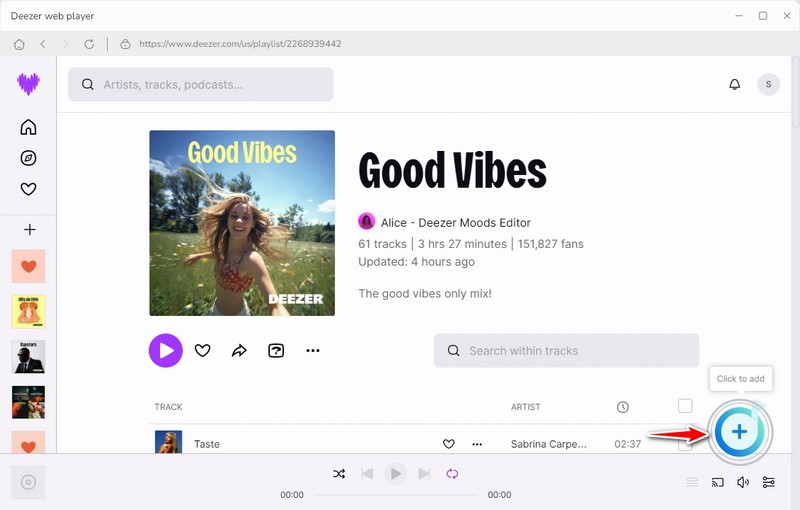
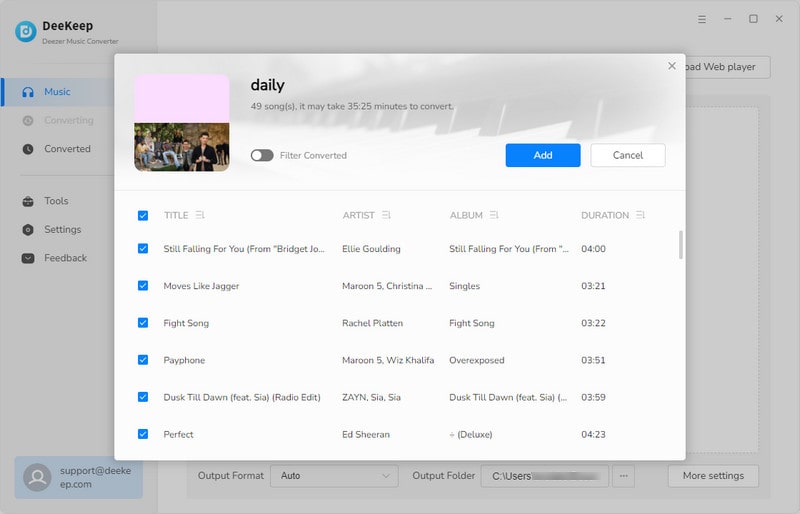
Back to the Deezer web player and browse to find the playlist or album you want to play on Tesla. Click to open it and press the blue Click to add button in the lower right corner. Then DeeKeep will automatically list all the songs in the new window. Pick up the specific songs and click Add.
Step 4.Convert Deezer Music
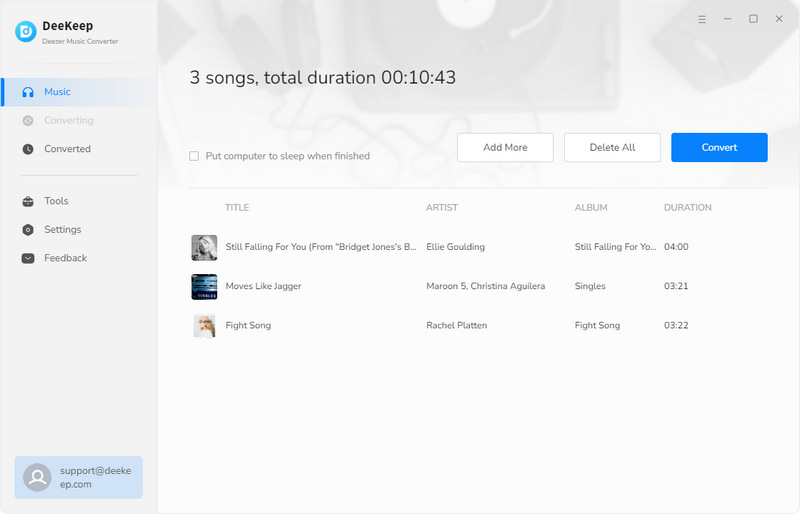
If you want to convert multiple playlists at once, you can choose Add More to go back to the previous step. When the selection is finished, click Convert to start conversion.
Step 5.Transfer Downloaded Deezer Music to USB Drive
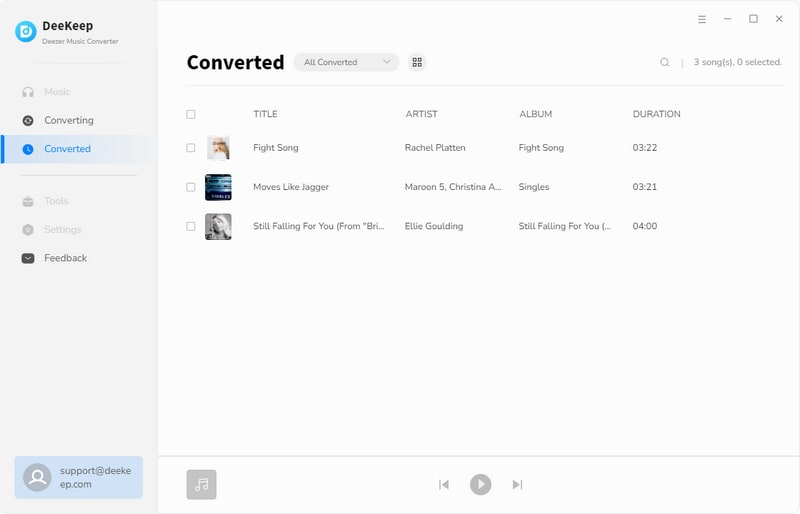
Connect your USB drive to the computer. And you can find the downloaded songs in the Converted section. Click the folder icon behind the song and the output folder you set before will appear. Select all the songs in the folder and copy them into the USB drive.
When you transfer the downloaded songs to a USB drive, you can plug the USB into the USB port of your Tesla, so you can start enjoying high-quality Deezer music!
Part 4. Play Deezer Music Via CD
The second way to play Deezer music offline on Tesla is to burn a CD for playback. Of course, there is no reader on the Tesla that can directly read CDs, so you must bring your own CD player to connect to the USB port on the Tesla. This may seem more cumbersome than plugging in a USB directly, but the advantage is that you can enjoy perfect CD quality. If you are a CD lover, you may wish to consider this method. Next, we will introduce in detail several methods of burning CDs:
✅Burn CD Via DeeKeep Deezer Music Converter
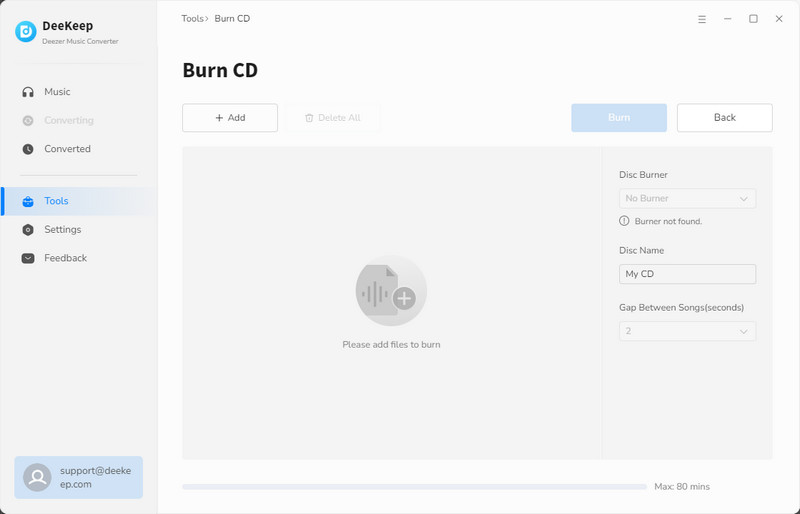
If you are a Windows user, you can burn CDs directly after downloading the songs in DeeKeep. DeeKeep provides users with a tool called Burn CD, which can help you burn songs directly onto your CD with a length of up to 80 minutes. The following are the specific steps:
Step 1.Go to the Tools tab in the left bar. And choose Burn CD in the interface. Insert a blank CD into your computer.
Step 2.Click +Add to select the songs you want to play on Tesla and add them to the list.
Step 3.In the setting options on the right, you can set the name of the CD, the time between songs, etc. as needed.
Step 4.When you have selected all the songs and settings, click Burn in the lower right corner to start burning the CD.
✅Burn CD Via Windows Media Player
Windows Media Player is a built-in media management software from Microsoft that can help all users burn CDs easily. The following are the specific steps:
Step 1.Insert the CD you want to burn into your computer. Open Windows Media Player.
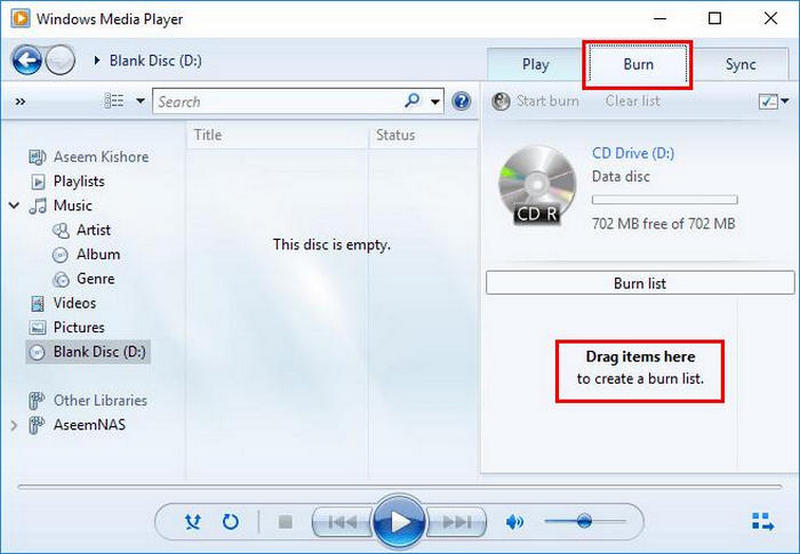
Step 2.Import the downloaded Deezer songs into the Windows Media Player, and then select Burn in the upper right corner.
Step 3.Drag the imported songs to the burn list on the left. After that, press the Start Burn button to start burning Deezer music to a CD.
✅Burn CD Via iTunes
If you are a Mac user, you can use the third method to be introduced next, which is to use iTunes to burn CDs. iTunes is a music software for Windows and Mac systems that allows users to burn CDs for free. You only need to import the downloaded songs into iTunes, and then follow the guide to easily complete the burning.
Step 1.Run iTunes on your computer. In the top left of iTunes, click "File > Add Folder to Library". Find the downloaded Deezer songs and upload them to iTunes.
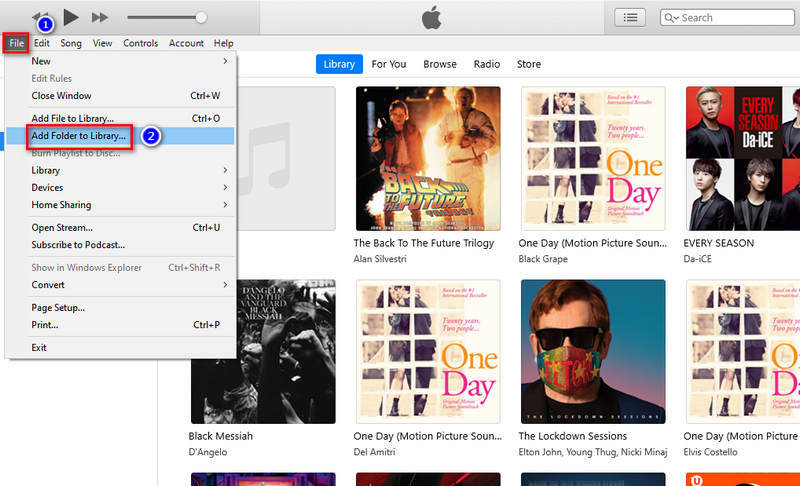
Step 2.Insert a blank CD into your computer.
Step 3.Put the imported Deezer songs into a newly created playlist.
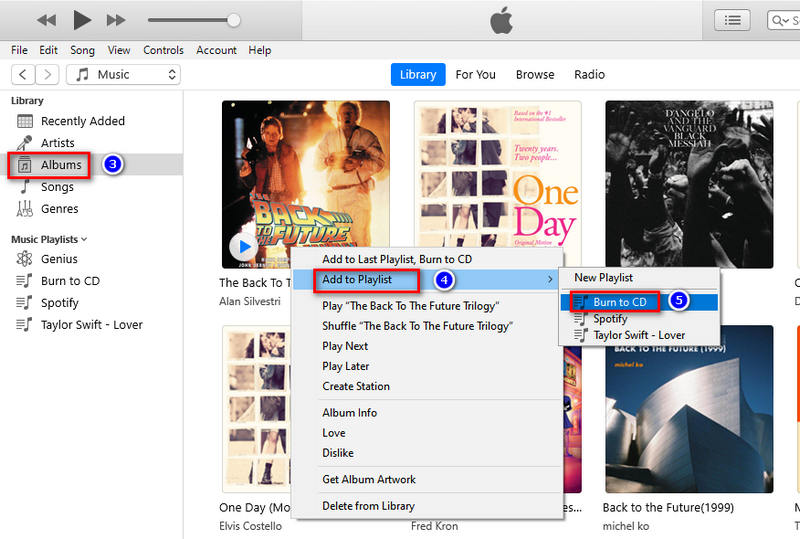
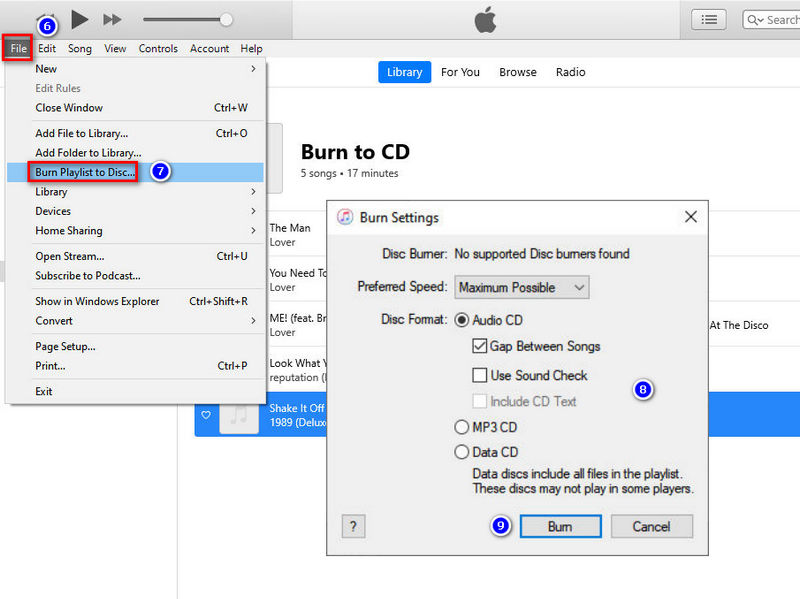
Step 4.Then go to the top left, and choose "File > Burn Playlist to Disc".
Step 5.After completing the settings in the pop-up window, click Burn to start burning the CD.
According to the above three methods, after successfully burning all songs to CD, you can use it to enjoy your favorite Deezer music on Tesla.
Conclusion
If you want to play Deezer music on your Tesla, we provide you with four methods here, including wireless transmission and playback through Bluetooth or TeslaMirror App, or downloading the songs through DeeKeep and transferring them to USB or CD for offline playback. The first two wireless transmission methods are very convenient and fast, but the sound quality will be worse than the latter two offline playback methods.
If you are still confused about which method to choose, then we recommend you choose the third USB method. This method not only avoids the degradation of sound quality caused by wireless transmission but also allows you to enjoy music offline at any time. As a powerful assistant, DeeKeep Deezer Music Converter allows users to no longer be restricted by expired subscriptions while retaining the original sound quality. Combined with a practical USB drive, this will definitely bring a new music experience to your life!


